I am not
sure how many of you visiting this page are familiar with the presence
and importance of the EFS thing that we are going to talk about
today! Actually, I often hear people requesting to offer a solution of a
problem that makes them unable to make a call, send a message, access
internet or any connectivity related thing. Imagine a mobile phone
without a network connection at all and you’ll then realize how horrible
it is!
So, if EFS is so important a
thing, it must be preserved so that you might be able to use all
connectivity features of your device. This thing is found in all mobile
devices which have an IMEI (International Mobile Equipment
Identity) number assigned to it but the location and directory where it
is stored might differ. On Samsung Galaxy devices, the IMEI and other
connectivity data are stored in this particular folder that I have been
mentioned several times so far.
What is EFS?
Having
read about the role of EFS on your Samsung Galaxy phone or tablet
device, you must be a little more curious to know something more about
it. EFS is a system directory that contains device specific essential
information such as its IMEI, wireless device MAC address, baseband
version, product code, system ID and NV data.
In
case the EFS directory is corrupted or lost, your phone or tablet is
sure to lose its IMEI number and wireless and network connectivity. You
might ask how and why does the EFS data on your device might be lost or
get corrupted? The answer is pretty simple and the reason might be a
daring activity on your part. Sometimes flashing a custom Kernel (as
reported by some users) and in most cases installing a custom ROM is
responsible of the EFS data loss.
In
this way, the EFS or IMEI loss is deeply related with what you do after
rooting your Samsung Galaxy device. Keeping this thing in mind most of
our ROM developers insert a script that automatically creates a backup
of the EFS data on the external SD Card so that you might restore it
back in case of loss or corruption. But it is certainly not wise to rely
blindly on the wisdom of others. That is why, whenever we write
installation tutorials for custom ROMs for Galaxy device, we warn users
to backup EFS before indulging in any custom development activity.
Sadly,
most people come to know about the thing called “EFS” only when it is
too late. Once lost without being backed up, recovering it becomes very
much like a wild goose chase. You might have heard or faced personally
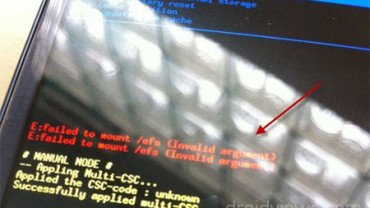
the issue when your device shows inability to mount EFS:
E: failed to mount / efs (invalid argument)
If
you get this message on your phone’s screen, believe me you have got
into a serious problem. Of course, there are ways to restore EFS data,
but they are either not available for all devices online or they do not
work at all.
It has been well said
that “prevention is better than cure” and this saying hold quite true in
this case too. Therefore, the first thing that one must do just after
rooting and installing a custom recovery one’s device is to backup the
EFS and the stock rooted firmware. For more enlightening tips, do not
forget to read the following article:
IMEI Backup & Restore for Unrooted Devices
Read the guide here:Backup and Restore Lost IMEI on Samsung Galaxy Devices without Root
How to Backup EFS on Galaxy Devices:
As
the very title of this article says, we are going to tell about a very
easy solution to backup the EFS on your Samsung Galaxy device. It is a
simple but wonderful tool developed by XDA member LiquidPerfection that
makes this job a plaything that can be done by anybody. The tool is
called EFS Professional and it supports most Galaxy range of Android
devices from Samsung.
The latest
version of the software also supports Samsung Galaxy S4 International
(GT-I9500), Galaxy S4 LTE (GT-I9505), AT&T S4 (SGH-I747), Verizon
Galaxy S4 (SCH-I545) and others. I have also tested it on Galaxy S3, S2,
Note 2 and Note 10.1. Besides, EFS Professional works with other Galaxy
phones and tablets too.
Features of EFS Professional:
- Backup and restore partition images to and from in .tar.gz format
- Detects backup archives automatically on the device and PC for hassle free restoring
- Device filter support to allow displaying important partitions for various devices
- Extract and read device’s PIT file to ensure efficient and accurate backup and restore operations
- Check MD5 hash to verify integrity of data written
- Format EFS to wipe all data and recreate partition
- Samsung’s Qualcomm devices support
- Option to display various device, ROM and BusyBox related information at the click of a button
- Restore NV data from internal ‘*.bak’ files if they exist to fix corrupt or incorrect IMEI number
- Repair NV data file ownership to fix ‘Unknown baseband’ and ‘No signal’ issues
- NV Backup and NV Restore options for US device variants only
Requirements:
Before
you can backup your device’s EFS data safely to your device and PC
both, here are a few things that must be taken care of:
- A Samsung Galaxy Device with root access (custom recovery not needed). If you have not yet rooted your device, you can do it using our easy rooting tutorials.
- The EFS Professional tool: EFS_Professional_2.0.68_Release.zip
- Microsoft .NET Framework installed on your computer: dotNetFx40_Full_setup.exe
- Samsung USB Drivers or Kies installed on your PC: Download
- Install BusyBox app stable version 1.20.2 on your phone. Install the app on your phone open it. Tap on “BusyBox” version number and select BusyBox 1.20.2. Finally, then tap on “Install” and install it as “Smart Install”.
- Charge your device to ensure 60% battery level.
- Turn on USB Debugging mode on your phone or tablet from “Developer Options” on your device: Read this Guide
Using EFS Professional to Backup EFS:
So, do you think you are ready for action now? Make sure you have made all preparations detailed above. If yes, let’s get started now.- Extract the “EFS_Professional.zip” on your desktop.
- Connect your Galaxy device to PC using an USB cable. Make sure USB Debugging is enabled.
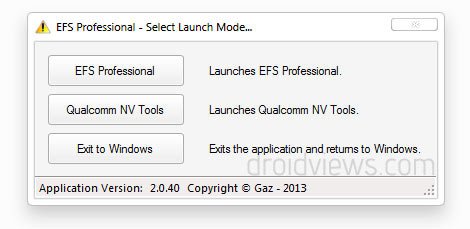
- Run EFS Professional.exe file as administrator. Doing this will prompt a popup window like shown below:

- Click on “EFS Professional”.
- You will now see a new window. Once the device is detected, the lower part of the window will show the device status and info such as model number, firmware version, root and BusyBox version, etc.
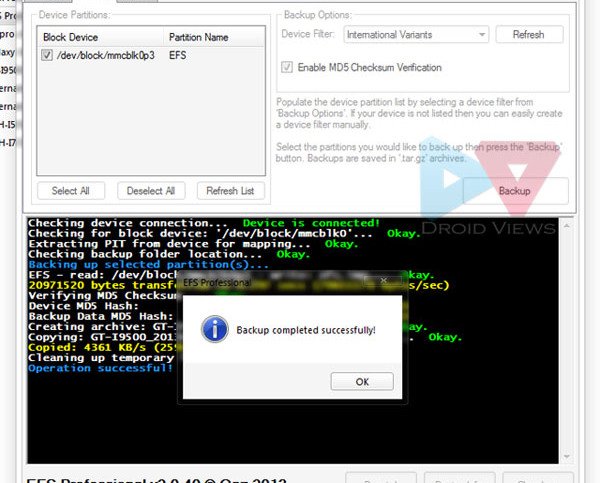
- Click on “Backup” tab and then click on “Device Filter” dropdown and select your phone model. If you do not see it listed, click on “Refresh” button and then select it.
- EFS Professional will now show the system partition where the EFS data of your device is located. Check the “Select All” box.

- Finally, click on “Backup” and your EFS data will be backed up to your phone and the PC both. The backup on PC can be found in the EFS Professional folder inside “EFSProBackup” and it looks like this: “GT-I9500_2013618_222210.tar.gz”
How to Restore EFS/IMEI:
Having
backed up your EFS data, you might take a calm breath and feel a sense
of security but it is also important to be familiar with the method how
you can restore it back to your Samsung Galaxy device in case you lose
it.
- Connect your device to PC
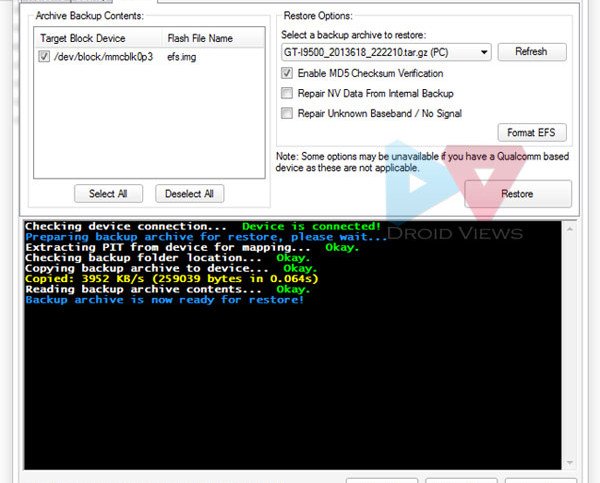
- Launch EFS Professional and click on “Restore” tab.
- Now click on the drop down menu in “Restore options” part of the window and select the previously backed up file.

- You can also format the currently corrupted EFS directly.
- Now click on “Restore” button.
Your
Samsung Galaxy device’s EFS/IMEI should now be restored back to its
original location. Dia *#06# on your phone’s keypad to check it it has
IMEI number or not.
Backup EFS Data on Galaxy Devices Using kTool:
There
is yet another handy utility for backing up the EFS and NV data on
your Samsung Galaxy device. It is a free app and called kTool. Since it
is a phone-based utility, it is easier to use. It supports almost all
Samsung devices except the Qualcomm based LTE devices.

Needless
to say that the app demands root access on your phone and besides
backing up and restoring the sensitive EFS/IMEI/NV data, it can also
perform various other tasks like-
- Boot device into Download and Recovery mode
- Dump and Flash kernel (and recovery) to /sdcard/zImage
- Flash recovery from /sdcard/recovery.bin
Note:
In case you notice that your phone’s lockscreen is not working properly
after backing up the EFS, go to Advanced Settings in the kTool menu and
enable ”Alternate EFS Dump Method”.
No comments:
Post a Comment